Confessions of an Apartment Therapy Addict (Mini Office Tour and Design Hack Rant)
Hello and welcome to 2022, a magical land where ALL OF MY GODDAMNED PREDICTIONS ABOUT THIS EFFING PANDEMIC HAVE COME TRUE BECAUSE HUMANS ARE SELFISH ASSHOLES.
Ahem. Now that I got that off my chest, all is not entirely bad so far this year. In the fall of 2021 we finally found a house that we love. While there were a few things I could complain about (like the former owners not cleaning anything), the truth is, this place is as close to perfect as I was going to find in a home that isn't a Palm Springs Mid-Century magically transported to a city I want to live in.
 |
| This, but maybe with a few handrails for safety because I ain't getting any younger. Image by Arek Socha from Pixabay |
But buying a home in the middle of a global pandemic that has caused product shortages and price jumps has not been easy. Especially since not only is this house bigger than the last, but when we sold, we downsized our already sparse furnishings. While living in a big, empty, echo-y space might sound like my dream, the reality is, it gets old quick. The solid birch 4 seat dining table that fit our mid-century bungalow perfectly now seems dinky when juxtaposed with our 9 ft kitchen island. The sectional loveseat piece that fit our needs perfectly in the apartment now looked half finished (which, to be fair, it was).
Adding to scarcity and inflation is the fact that buying a home doesn't exactly leave a whole lot left in the bank for grandiose furnishings. But if you've learned anything from the near decade this blog has been around, I'm a cheapskate DIY-er who just needs a little inspiration.
Enter Apartment Therapy.
After chasing the likes of Pinterest and IKEA Hacks down many a fruitless path, it just felt like Apartment Therapy "got me." Most of their before and afters include simple and affordable upgrades to mass market pieces that all seemed within reach. Especially for small spaces like the 10' x 11' room that would become my office. I'm the kind of person who needs a desk for organizational purposes, but I've never been able to think creatively while sitting at one (case in point, I'm writing this from the armchair that has been my perch for several years).
And so using this article as my inspiration, I set out to recreate a built in window seat/cabinet situation in the main space, and turn the long, shallow closet into a "cloffice" that I could easily shut away when I didn't want to think about work. Except there was one snag: how was I going to get the clean, finished look of built ins without actually using built ins?
See the problem is, my office is carpeted and I have plans to remove it someday, but a far flung someday. Also, I haven't entirely committed to keeping the "Agreeable Gray" that literally every home built in the last 5 years is mono-chromatically bathed in. But after finding a couple of pieces I liked and adding a few small details, this is what I came up with:
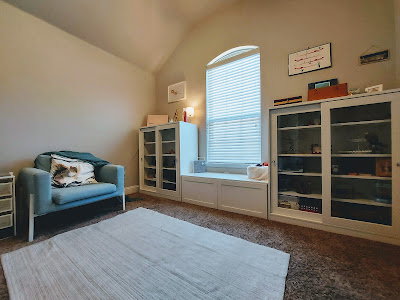 |
| Squirrel pillow was nonnegotiable. |
Now, a smart person would take "before" pictures of their empty room, but I am more impatient than smart, so you'll just have to imagine it empty. The glass door cabinets originally came with plain white wooden knobs, but one of the main takeaways I have learned from pouring over design hacks is that hardware makes the difference. In my case, $2 worth of hardware was all it took. I found brand new square chrome knobs at a resale shop for 50 cents each. For the window seat, the cabinet I used (an IKEA Besta media cabinet with 2 doors) was only 15 inches deep while the cabinets were 19 inches. To create the illusion that it was all the same depth, I also purchased from IKEA a bathroom counter top which happened to be 19 inches deep and just a hair longer than the media cabinet.
Originally, I'd planned to go all the way up the wall with book shelves or cabinetry, but I'm glad I didn't for two reasons. One, without doing a custom build, I could not bring anything all the way up the sloped ceiling, so there would be a lot of awkward empty space, and two, I saved myself about $1000 by opting to glitz up some economical options instead of buying bigger, solid wood pieces.
For the closet area (I refuse to say cloffice again), I spent a whole $20 on a task chair from Bed Bath & Beyond:
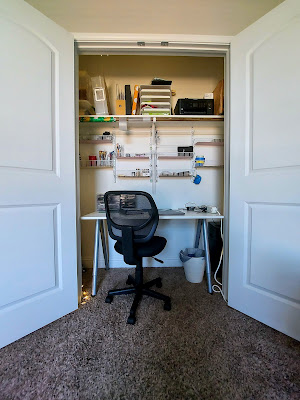 |
| Gotta love those sweet 20% off coupons. |
Originally, my plan here was to remove the clothes bar and existing shelf, build a desk and some shallow shelving going all the way up, get a cute chair that matched the warm neutral palette I was trying for, and install some lighting. But, you know, money. Also, the supply chain issues aside, I made a promise to myself that I would not add to the climate crisis by reusing things I had and buying used whenever possible. Since I needed a desk and my husband needed a bigger desk, he gave me his and took the previously mentioned dining table. Instead of new shelves, I repurposed an over the door organizer into several small shelves that I lined with pieces of cardboard from the furniture packaging. I even managed to use the plain wooden knobs from the cabinets as spacers for putting up the wire shelves. And the lighting? Instead of spending $300 to install light strips, I lined the inside of the door with a string of holiday lights I picked up on clearance for $1.50 a few years back.
Overall, not too shabby. Eventually I'll add a few picture ledges for both art and story boarding, and I'm looking for something to turn into a step stool so Nick! (the ! is part of his name now) can sit in the window and bark at neighborhood cats.
 |
| For now he's content to steal all my throws and sofa real estate. |
Eventually, I'm going to move on to other rooms, so of course, that means more Apartment Therapy and more DIY makeovers, hacks, and remodels. But now that the whirlwind of my first project is over, I've noticed more than a few of their featured makeovers give me pause. See, as someone who spent over a decade in a home that needed to be rebuilt from the guts outward, and who has tried and failed and tried again so many times I feel as if I can actually qualify my own advice with experience, I can say that a lot of their "hacks" might look good for a photo shoot, but aren't going to hold up much past that.
Take this article, for example. It's a beautiful mudroom and a clever use of items in a way they weren't intended (I did the TV stand bench myself above), which I can't stress enough, is the out of the box thinking needed with scarcities everywhere. But this isn't a mudroom. It's a garage and I highly doubt it is climate controlled. Those wardrobes have exposed particle board on the backs and maybe even underneath and concrete is porous, meaning moisture is going to wick into the wood and cause rot or maybe even mold (source: the walk in closet in my old house that had formerly been an enclosed porch).
Not only that, but it's a garage. Take another look at that before picture. There is no way all of that stuff is hiding inside the wardrobe and if it is, I doubt it will stay organized forever. Plus, based on the scuffs and stains, it is a garage that gets use, therefore those white cabinets aren't staying white forever (and that fake potted plant is nothing more than a trip hazard).
That one was, in my opinion, a bad choice, but this one might actually anger me a bit. On the surface, it's not too bad. A dated, yet not terrible kitchen gets a modern remodel without gutting and wasting perfectly fine cabinetry. Honestly, the before pictures on this are not bad. I admit, I am not a fan of the golden oak, but the squared off shaker style makes it look a lot better than some of those really dated fronts. I love the floors and the abundance of natural light from the window and patio door. And the counter top has a modern eased edge.
Personally, I would have opted to stain the cabinets a more contemporary medium to dark color since I am not a fan of painted cabinetry (source: my previously mentioned kitchen island that was for some reason, painted white while the rest of the kitchen is a natural wood), but I'm not even mad about it because yes, it looks nice for now and in 5-10 years when everyone hates white and gray, they can repaint or come to their senses and strip the paint.
No, what made my blood boil was the fact that they painted and epoxy coated stone counter tops! Like, what the actual heck? Yes, it was mentioned that they were stained, but there is such a thing as granite restoration. Also, I have not found any definitive answer as to whether or not epoxy resin is food safe, but the internet seems to think some is and some isn't. But beyond that, epoxy will yellow with age (source: art gifts made by my husband that have yellowed over time). Oh, and it will also stain, so why bother?
And thus concludes the rant portion of this post. Am I going to stop obsessively perusing before and after home makeovers? Of course not. The title doesn't say confessions of a former Apartment Therapy addict, does it? No, I'm certain there is much more to learn, many more inspirations, and most certainly a whole lot of rants to come.
Lastly, thank you to whoever at Blogger added the very easy to use alt text interface. As someone with less than stellar vision, I am grateful for the normalization of courtesies. I only regret that my descriptions might not paint the most vivid picture, but I am working on how to be brief, but thorough.
Comments
Post a Comment
All comments are moderated. Please only post once.